9 August 2013

August 2013


The Ecostruction team have finished for a month now. It is obvious someone has trained them well - the site is tidied and everything inside has been swept clean.  Today was the first time I could walk around the rooms and get a feel of the place. Even though the internal partition walls aren't up - I feel really pleased with the volumes, views and room arrangement.


Although this photo was taken standing in what will be the guest bedroom and a partition wall will divide the space - it looks OK. It will be OK!

I love this view/photo. Again - I'm happy with the volumes and proportions. The big lower window (from the living room) really makes you feel like you are outside.


This photo was taken standing in the entrance of my future bedroom looking across the living and dining rooms. All this space will remain open. Although the house is meant to be small (down-sized) - I wanted the feeling of open space.

 So - now that the builders are off site for a month I can get on with a few projects of my own!  Originally I had planned to have this bank between the lawn and the drive as a wider gentle slope to be able to run the lawn mower along.  And only building a retainer wall lower down the drive where the height difference is about 1.8m. However - it would be much easier if the stone wall continues around the full corner up to this point here where is 'vanishes'.  This would make the lawn easier to mow (wall top being level with the lawn) and the drive easier to keep clear of weeds/grass encroaching from the lawn.


Over the first 2 days of August I worked on digging the foundations for the wall.  Ruddy hard work with the temperatures well into the 30s!  Also the drive had been really well compacted by the lorries. At least this means I don't need to dig deep to find good hard ground!
Over the next week I will have to take the trailer to get around 100 blocks for the first stage (3 trips), then some ballast for the foundations and then a load of sharp sand for the block work. We will see where I am next Saturday!

Friday 8th August evening after quite a hard week. My plans all went by the board with the car playing up from the beginning of the week and finally breaking down on Wednesday. So - I had to have the blocks and sand delivered by lorry and cycled the 20km to Ansouis and back every day!
In spite of this I managed to lay some 130 blocks.


   I decided to load all the broken building blocks into the wheelbarrow and wheel them up to the top to load inside the wall for drainage. After putting in about 40cm of these blocks broken further by hammer, I put in a geo-textile layer to prevent earth seeping in and around the blocks and to ensure the drainage continues to work.


 The digging out by the bulldozer exposed the old  wall that had been buried for probably more than 200 years.  I managed to dig out the stones to use for facing the new wall. Looking at this photo you wouldn't think I had finally extracted quite an impressive pile of stone. Unfortunately you can't see how large they are!

Saturday 17 August.

Finished the last section of the concrete blocks.  I stopped 3m from the property limit because the tool shed/car port will be across the end in line with the boundary and I need to make the last 3m wall 90 degrees this. Looks good!


Just got a call from Karine looking for a quiet couple days in the countryside (she lives with her husband Bruno in Marseille).  I've known Karine since she was about 18 when she came to work in the lab in Luminy.  She since became 'Mum' - and now 'Grand-mother'! But she still doesn't look a day over 25!  I'm not sure she knew what she was in for when I suggested she come and help me with 'a wall' !  What ever she put a brave face on it and worked amazingly well!!! 


Here are the results of our 2 or 3 days work!!!   Hard, heavy work (all concrete and cement mixed by hand) but so satisfying! For some reason the top doesn't look flat in the photo - but it is!

Still having to cycle to the house and back (42km) or one way if I get a lift. Sadly the car seems to have given up totally now. Time to try and find a replacement.


31st August 116 days to Christmas!

It has been a couple weeks since I last up-dated the 'blog' - but believe me I have been working on the project.  Since the above photo I have now finished the wall around the 'corner' to where it stops and  will only be a rendered beyond up to the future workshop and car-port.  To end the stones tidily I decided to put in a buttress of blocks. Looks fine.  Then I finished the top of the wall cementing in the stones to give a solid structure and neat appearance.


I'll have to wait to see what render the house will be done in and therefore the workshop before I render the wall.  It might have been nicer to finish the entire length in stonework - but far too much work, too few stones and it would have made the drive a bit tight passing the tree on the right for the lorries.


So to the next project.  By the pond an old path leads up to the old house. The boundary of my land is this wall on the right. So I decided this would make the ideal position for a little shed for garden tools and the lawn-mower.

The path is sloping up so I needed to dig out the crazy-paving Bernhard and I had put down 9 years ago.  Sadly - like most of our work - it was made to be there for the next hundred years! The concrete underneath was about 2 inches (5cm) thick!  Very very hard work even with serious crow-bars!  Finally managed to break-up and lift out a 2.5m stretch.


 All this only to find an absolute mat of bamboo roots!  Digging out these alone took a full day.  The only good thing was that I could work in the cool shade.  Eventually I managed to dig back level from the front and 1.2m wide.  Then I went wrong!!!  I had thought that it would be a good idea to use the remaining 15cm concrete blocks for the structure. But after shuttering up and pouring in the foundations (re-inforced) and raising it 2 runs I decided that I was going to have too small a shed for all the effort (and cost). So I bravely knocked out my day's work and went back to the drawing board!

I've decided to widen the shed by about 40 cm, with concrete blocks for the front and back short wall sections (to give a solid support for the roof and a tidy finish) and then only put in corrugated metal sheets on the bamboo side. That side is inaccessible and the sheeting would not be more than adequate as a weather barrier. Also - I have enough blocks for this design - and already have the metal sheeting!

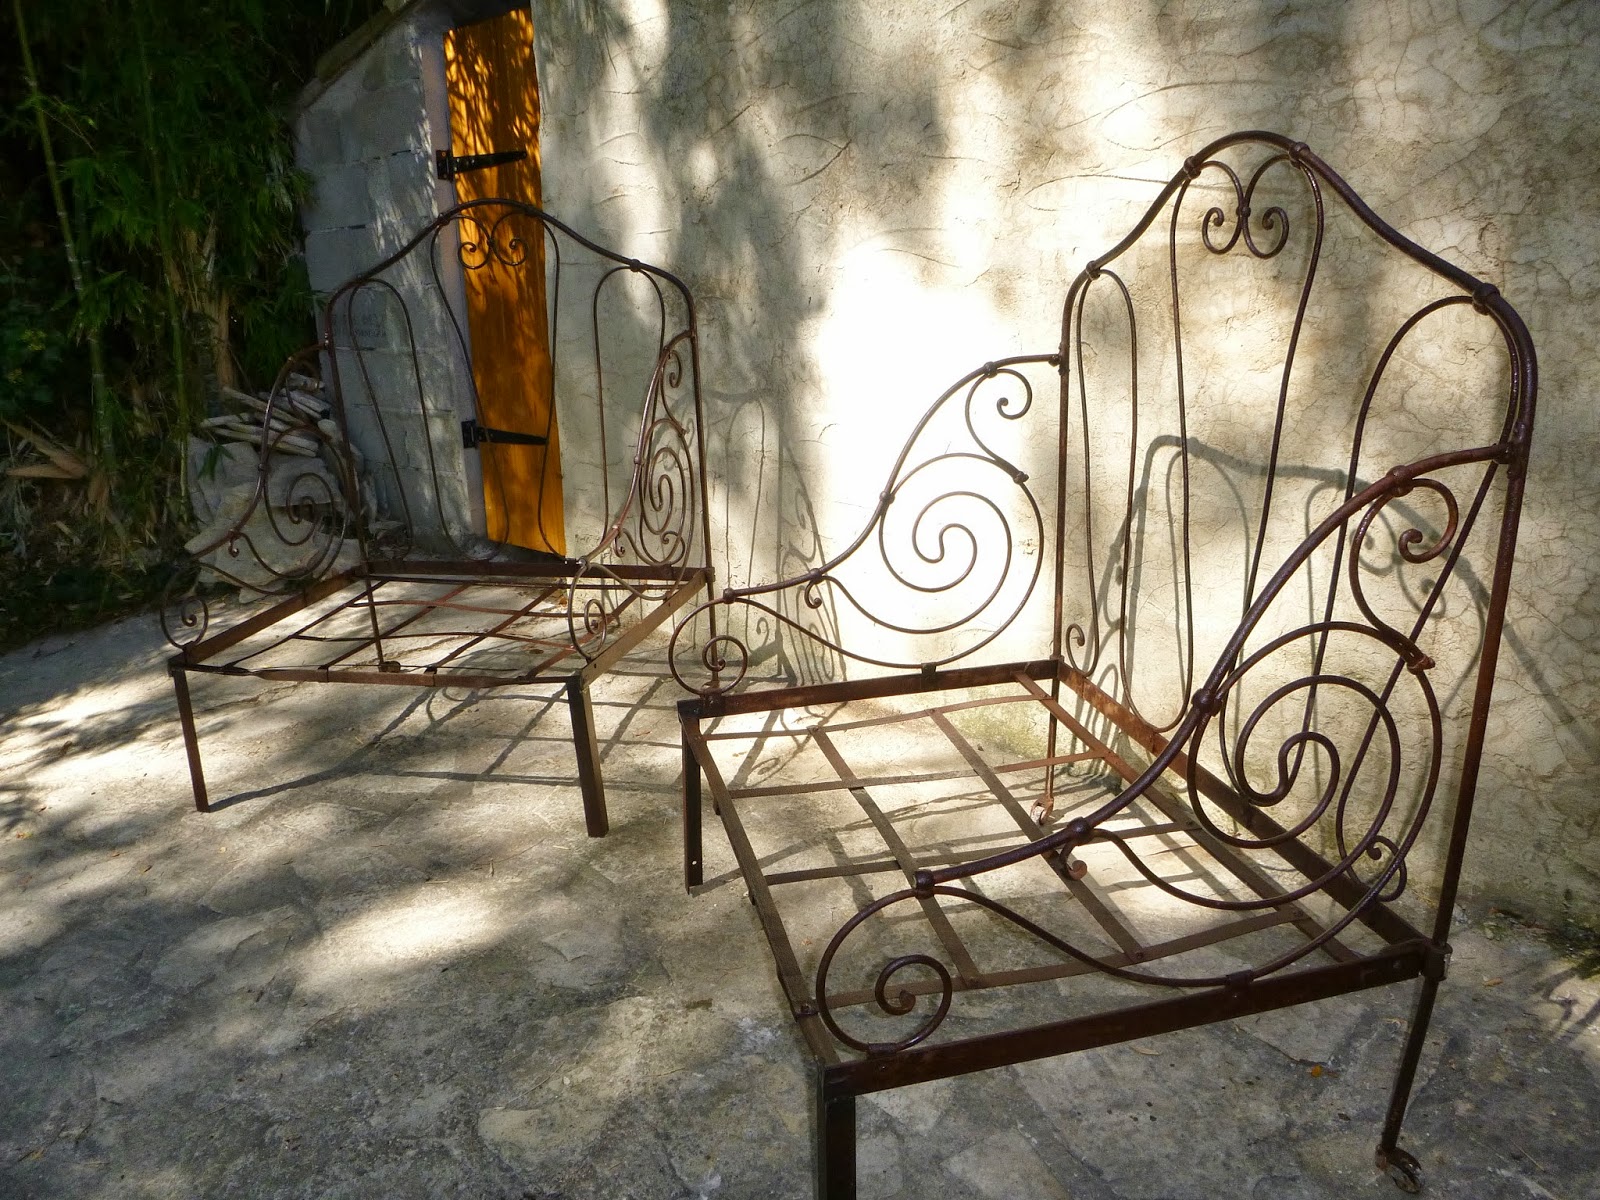
Another little project. I dug out the old metal bed I had found on the site 10 years ago. I am either going to re-model it to be a settee or - more likely cut it into 2 (cutting either side of the central crest thing) and make 2 wide- seats with the bed ends as seat backs!


Finally - I had a quote for installation of the waste-water treatement (the reed bed system), including the pipes up to the beds and drainage ditch after -  13 000 Euros!  I think I shall be doing this myself! 

10 September 2013

September 2013


So - the builders are back after their month's break. I'm glad to say they did notice I had built the wall - and they were suitably impressed!

Antoine has been setting out the work plan and  it looks like we wont be on schedule for me to move in at Christmas.  Once the liquid concrete is poured above the underfloor heating system - you have to wait a month.

Although you may not see much change in this photo - the gable ends are now raised to height (minus insulation and roofing). It looks e good, not too high and well below the bamboo level - and out of sight of the old house.


In side I can now get a feel for the size  and height of the office  and attic rooms.  The views are so nice from up here I wish I could leave the roof off !


The view from the study/ office - might need to cut those branches - but it's still great !


So - back to the tool shed building.
You can see in this photo where I decided to knock out the block work on the bamboo side after realising it was going to be a big and expensive job for very little storage space.  However - digging out the bamboo roots to gain that extra 40 cm took me 4 hours hard work. Very hard work.  Once it was out and below the original foundation (which were too hard to dig out), I concreted in this area and continued up with the block work at the back and front. The bamboo side doesn't need block work as it is absolutely inaccessible.


I already had on site some old scaffolding frames which I cut to give me the 2m long roof supports. Perfectly strong enough, and offer better head clearance wood of similar strength. Also - they were there and free. Putting the in correctly was a bit tricky with no 2 walls true to each other! It is a really crooked corner.  Cutting the PST (undulated roof sheeting) was also a bit hard because the wall to the right is uneven stone and very bowed. But it came together fine in the end.


Still need to finish off some work on the concrete blocks, filling under the roof tiles and fixing them more securely and then to put the door in. Or maybe I should do the rendering first.


Just quickly popped my work tools in before it started to rain!   Using corrugated metal sheets (on hand) to close the bamboo side gave me more space again.


So - the tool shed structure is up - and it looks OK in that corner.   The next few days are likely to be a bit wet - and still no car. I think my next priority will be to sort out transport.

19th Sept.
My legs have never been particularly photogenic - but as you can see from the below - they are even less so now!! NB - my legs are not slim but a lot of what you see is swelling! Honest!!  So much for the health benefits of cycling.  I wont bother to put down what I think about people who are stupid enough to keep vicious dogs.  I took this photo a week after the 'attack'. You can imagine what it looked like before!  I was 'saved' from losing a chunk of my leg by my thick jeans which were elastic type material -so the Alsatian's teeth didn't manage to go deep into my thigh. But the force in the bite was pretty impressive. I daren't start to imagine what such a bite would have done to a kid - or to me in shorts.  I don't know if I did the right thing in not reporting it.  I was never scared of dogs before - but in the last week 2 other muts have chased me on my bike and I now feel  - scared sick. 


 Heading up to the house to take some photos which I'll post later. 


Gorgeous day (as you can see).  Antoine, Nicco and Boris were just finishing sweeping and clearing up. I really have to say the site and building is really neat and tidy.  No rubbish hanging around, everything is always finished off so perfectly.

This last week they have made impressive progress with completing the reinforcing around the top of the walls and fitting in of the roof beams.  It looks so good.


This is the view towards the kitchen - this area will be 'open' up to the  beams.  Which will be about 3.7m at the highest point.

 It's strange to start really seeing the volumes of the rooms and ratios of heights to room sizes.


The attic room here, has a small window for natural light/ventilation.  I' ll probably have a sliding door into this room from the stop of the stairs as there wont be height for opening inwards and opening onto the landing wouldn't be very safe.  I think the clearance is about 2m down to 1.2 (across 3m) and the room is 4m wide.  Ample for storing more than I should be keeping anyway!


Viewed from the field below, the house is starting to really take shape.  Today we talked about the log burner (see photo below) and flu clearance and the gutter at the back of the house which has to be integral to the wall.

The windows should be arriving in the next couple weeks, and will go in after the roof is on.  I've also found a fantastic deal for the main door.  I had 'glanced' at oak doors but after seeing the prices (upwards of 1800E) looked towards semi-hard wood doors (700 - 800E range). However, I saw a perfect (new) solid oak door,  exactly what I want, when I was at the garage trying to sort out my car problem. Apparently someone had problems in paying their car repairs and had offered the door in payment.  So I got it for 300E delivery included!!    The savings I made there will cover the cost of the car repairs!!


So here is the log burner I have chosen. Invicta Ove. Double burner so very ecological - and - what a beautiful machine!
22nd Sept
So here are the two seats I made from the old iron bed !!  I cut the head and foot ends off at about 60cm exactly where a suitably placed reinforcing bar across the base was and through the ornate sides, then rounded off the sharp edges and welded on 2 legs to each new chair.  I'll need to either have very 'stiff' cushions - or to add more base webbing - but after treating the metal with a special protective finish - they are pretty well finished!  They really suit the area by the pond.


29th Sept
This month has seen real progress with the house. Very good atmosphere with the builder team - equally positive and constructive meetings with the various members (bulldozer man, galandage window man, kitchen fitter, plumber and tiler). Good exchanges of ideas and problem solving thoughts.  Antoine has prepared the 'planning' for the rest of the building work bringing completion to the 1st week of February. That's fine - and having the detailed plan in hand helps everyone!


The roof structure is now on - ready to receive the insulation (under) and sheets of roofing - on top of which are laid the tiles.

The 'genoise' are all finished - and looking so neat!   A genoise is a tile 'over-hang' which carries rain water clear of the walls. Traditional houses here in the South of France don't have guttering.  The higher the house the greater the number of overhang layers (up to 4).
 So this is looking across the dining area towards the entrance door and into the kitchen.  There wont be any suspended ceiling so when finished this is the height of this area - up to the roof apex. A bit odd with light coming through at the moment - but the volume is great!


The guest bedroom will also enjoy a high ceiling dropping to 2.4m at the back wall.  The 2 areas together create such a great volume - it's a shame I have to have a wall diving it!  The internal wall here will have to have good sound-proofing.   The structure will be 7cm brick, clad on one side with 2 layers of 1-2cm pharmacell boards. Sandwiched between the boards I hope to be able to use 'Green glue' - which is recommended for reducing sound transmission.  The cost of green-glue for this wall will be around 200E - but if it offers good sound proofing - should be well worth is.  The pharmacell boards (not plaster-boards which aren't too ecological) aren't cheap either - but I think this would be a good solution / investment. Sound insulation in the house is so important.
Finally I found some really great 'oak' doors in LeRoy merlin. More expensive than the ones I had identified on the internet but so much better a feeling and quality.  Also - these oak doors came in the 2 sizes I need(83 and 73cm) and in sliding door version.   Windows have also arrived now and can be collected as soon as we are ready to fit them (2 weeks time according to the plan).
 So to my last image for September. The front door. Some friends delivered it for me to the house and had left it leaning against the wall (not the best position for an unsupported door - it weighs just over 100kg)!!!  I managed (alone) to lay it flat on 2 5x5cm pieces of wood - with huge difficulty as you can imagine - and couldn't resist the temptation to leave a surprise for the builders tomorrow morning!  When they try to lift it I think they will realise how very close I was to being left flattened!!!
So the summer is coming to an end.  The builders are now pushing ahead to ensure the roof is on before the colder wet weather arrives.  However - it happens to be wetter here in the summer here than in the winter - but it can also be much colder than you would expect going down to minus 15C! This last week they have been working on the 'rives' - edges of the roof. More labour intensive than I had realised. The work looks very tidy - even if you can't see it on the photo.

I've been pondering what I can do with all the off-cuts of tiles!  Surely I can make some sort of flower-bed structures?! The roof will be completely water-tight in the next day or two, and then they will do the tiling. The log burner has also arrived (167kg) and been stored in the garage until February and the windows have also arrived. I'll be arranging to pick them up as soon as I have a truck.

11 October 2013

October 2013


So my work this week was to build a wall to support the 2 letter boxes. The old box was only a pole and frequently knocked over by young idiots with nothing better to do! I decided to do something a little more in keeping with the old house and garden walls.  Now we will get two name plates for the 2 houses to go on the front.


 Once I had the special sand and Tradifarge cement (with lime) I rendered the little tool shed to tie in with the existing retention wall. Looks so much neater! Eventually I plan to do some sort of mosaic on this back wall and a 'living-wall' on the stone wall (on the right). 

29th October
Sorry - looking at the last 'post' I realise I am a little behind with the blog. The last 2 weeks have seen the roof completed, vapour-barrier stapled onto the beams below, the cellulose wadding insulation blown in and the aluminium grid fixed to plaster.  A huge amount of work - (dirty work) in a short time.  
 The first of the internal walls has been started too. Odd to see a door sort of suspended in a blank space. Again - the volumes are looking great.
 

 Left is my upstairs office area. The 'hole' is the access to the attic space above my bedroom and shower room. It makes this 'space' more accessible than if I had an attic trap-door put in the ceiling. 


And while the building team have been hard at work - I haven't been sitting watching. I've done the evacuation of the waste water, sorted out plan of attack for the waste water treatment in / on reed beds, drainage of the lower field and enlarging of the entrance area to the property.


The pipe may look as if it is slanting in the wrong direction - but believe me there is a drop of 2:100!    Got Stephane back for the drainage digging. As he dug the trenches you could see the water just running out and down.

So after a day of digging - he had the next morning off and Bruno and I worked on laying out the geotextile and drainage pipes.  Surprisingly hard work - mainly because of the clogging mud and having to perpetually jump across the ditches or climb out of the trench.

As you can see - we extended the ditch to Bruno and Christel's side to drain their field too. 

The chippings arrived and the afternoon was spent working with Stephane and Bruno to hold back the geotextile while the chippings were tipped in with the bulldozer.   Tomorrow the trenches will be filled in and  we will then move back to the top to finish sorting the entrance area.   

After that it is the reed beds that we will need to be set out for digging.  I've been in  close contact with Alexander Cras (Aquatiris) for guidance in doing it myself.  The quote for having it done (along with all the above drainage trenches) was not acceptable (13000 E).  If you 'go it alone' part of the contract  I signed with Alexander was a 'kit' of some of the essential materials, and his presence on site at crucial times.  So - the ponds will be marked out for Stephane to dig (top one of 5m x 2.5m by 1m deep, and second one of 2m x 5m and 60 cm deep). We'll do them at 20 cm less - then I'll do a re-inforced frame around the top edge 20 cm high to secure the pond liners and stabilise the pond edge.  Once I've sorted this out - I'll have time to organise the planning and ensure I have all the necessary materials and that I'll be able to arrange delivery of the correct sand and stones of various sizes.  Time for a nice cup of tea and bed - I'm exhausted!


October 30th. Another hard but rewarding day.  All the drainage trenches are completed and refilled, the platforms for the two basins have been created and the beds dug. Top one to be  1m deep for the vertical filtration and the lower bed 60 cm deep for the horizontal filtration.  Again Stephane's skills on the bulldozer were amazing.

                                                                                                                                                                      
  Even with the detailed plans from Alexander - we had quite a bit of head scratching to ensure we had it right (outflow of the top basin is at the bottom of the tank and flows into the second basin at surface level). One thing I'm still not sure on is whether or not I should build the re-inforced concrete 'frame' now or after the pond liners are in place. 


The kit (liners, geotextile, inspection pit things and some of the plumbing bits) should arrive next week. So for the moment the edges have been covered with sheeting to prevent any collapsing.